Review SBrick Plus
Review

REVIEW SBRICK PLUS
INTRODUCTION
It feels like yesterday, but it's already over two years ago that Vengit introduced us to the SBrick! The SBrick is a versatile LEGO compatible component, used to control your PF elements via a smart phone or tablet. The Kickstarter project reached its goal and SBrick was born. Two years later a new family member is introduced, the SBrick Plus. Sounds like an SBrick with additional functionality. Well, let me tell you a secret...it is! The form factor of the SBrick Plus has remained the same. So have the four connectors. The SBrick Plus is fully compatible with the SBrick. The difference between the regular SBrick and the SBrick Plus is that the Plus version is able to communicate with the two available WeDo 1.0 sensors: [list] [*]Motion sensor [*]Tilt sensor [/list] The following descriptions have been copied from [url="http://www.legoengineering.com/wedo-sensors/"]LEGO Engineering[/url]. [b]MOTION SENSOR[/b] The motion sensor (part 9583) can detect objects very roughly up to 15 cm away, depending on the shape of the object and other properties (reflection, colour, etc.). It is sometimes called a distance sensor. Very technical details: The motion sensor is an active IR (infrared) sensor. One of the visible parts emits a light while the other is the detector. The LED light is pulsed at 7 kHz. You might be able to see (and show) the flashing light using a camera phone. The sensor can work with 5 to 9 volts, with the WeDo set at 5 volts. [b]TILT SENSOR[/b] The tilt sensor (part 9584) detects changes in position. It can detect six different positions: tilt this way, tilt that way, tilt up, tilt down, no tilt and any tilt. On occasion, the vibration of the motor will interfere with the accuracy of the tilt sensor. The fix for this is to design a construction in which the motor vibrations are isolated from the sensor. In this topic I will demonstrate several aspects of the SBrick Plus, starting with the WeDo 1.0 motion sensor. This review will be expanded with more information and videos later.TEST MODEL
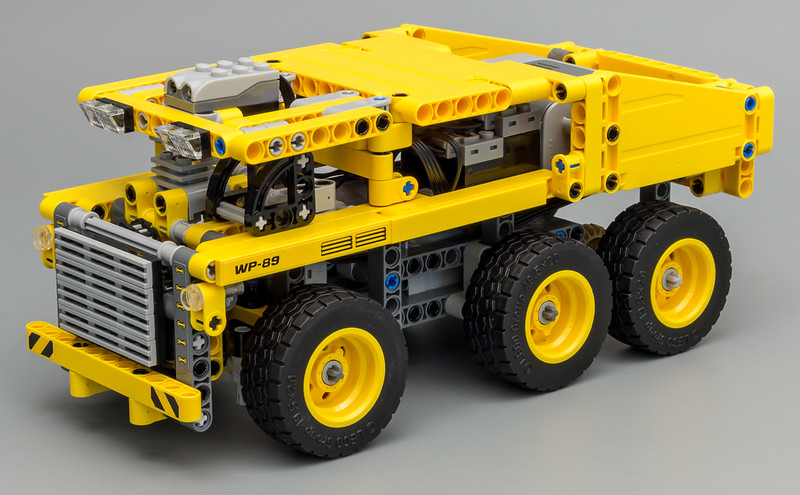
To test the SBrick I have made MOD of two copies of the [url="http://brickset.com/sets/42035-1/Mining-Truck"]42035 - Mining Truck[/url]. The only extra parts I used are some PF elements: [list] [*]1x PF Servo Motor [*]1x PF L Motor [*]1x PF Battery Box [*]1x PF LEDs [*]1x PF Extension Cord [/list] [url="https://farm6.staticflickr.com/5743/29612115723_67284cd26b_o.jpg"][img]https://farm6.staticflickr.com/5743/29612115723_0009f01353_c.jpg[/img][/url] In the rear of the vehicle I have mounted the PF Battery Box. The SBrick Plus is tucked away in the middle of the vehicle. [url="https://farm6.staticflickr.com/5721/29611192914_e0baa1cb9b_o.jpg"][img]https://farm6.staticflickr.com/5721/29611192914_587892f4c8_c.jpg[/img][/url]MOTION SENSOR
For my first video, the Motion Sensor is attached to the roof of the model. [url="https://farm6.staticflickr.com/5702/30156274301_5130afe330_o.jpg"][img]https://farm6.staticflickr.com/5702/30156274301_dca1f00db4_c.jpg[/img][/url] For this video I have connected the SBrick Plus to an HTC running Android. In the introduction you can see the SBrick Plus test screen. Here you can connect to the SBrick Plus and test the ports. As you can see I have attached the Motion Sensor to Port A. You can see the distance measured by the sensor as I move my hand closer. I have also attached a set of PF LEDs, which can be tested by sliding the Port B slider. In the profile designer I have created a sequence which will blink the LEDs a couple of times. Creating sequences is something you can do with the regular SBrick as well. So, we have blinking LEDs and we have a motion sensor. Now what?! Well, we need to create a circuit to let the sensor values determine the action. As you can see in the video there are different Logical options to make a circuit. For this demonstration I will use the "On change" option. When my hand is close to the object, the circuit triggers the sequence called "Flashing Lights". Let's take a look at the final result. [media]https://youtu.be/nfGatS8Zk0c[/media] As you can see the Flashing Light sequence is nicely started when my hand is close to the sensor. The WeDo sensors aren't very accurate, but they are accurate enough to detect an object in front of the sensor, which results in lots of possibilities.CONCLUSION
I needed some time to get used to creating circuits and sequences, but when you have done this once or twice, it's really easy to accomplish. The profile editor truly is a work of art. I love the fact that you can modify the graphical elements of all controls, resulting in a personalized smart remote. Do you need to get an SBrick Plus instead of a regular SBrick?! That obviously depends on your need to use WeDo sensors. When you are creating demonstration models, the SBrick Plus adds a lot of value. When you like to manually control your model, the regular SBrick might suffice. Is your regular SBrick depricated now? No, it definitely isn't. SBrick can be mixed with SBrick Plus in the same profile, so there's alway use for your current SBrick. Controlling your model with a regular SBrick, while the SBrick Plus listens to the sensors and acts accordingly. That's a win-win situation. All things considered I really like the SBrick Plus, so I definitely recommend getting one, or two. I will add more information to this topic in a later stadium. More information about this project and the possibility to back it can be found on the [url="https://www.kickstarter.com/projects/sbrick/connect-code-create-with-sbrick-plus"]Kickstarter page[/url] of SBrick Plus. [url="https://www.kickstarter.com/projects/sbrick/connect-code-create-with-sbrick-plus"][img]https://c2.staticflickr.com/6/5624/30126784822_a4a9297c04_b.jpg[/img][/url]Discussion about this set can be found here.