Review - 75144 - Snowspeeder
Review

REVIEW - 75144 - SNOWSPEEDER
INTRODUCTION
The year is 2005. I am in a toy store looking for the Mindstorms set, unaware of the fact that the average toy store only sells the mainstream retail sets. I go home with a large Technic crane to fullfill my needs, basically ending my dark ages. At that time, the [url="http://brickset.com/sets/10129-1/Rebel-Snowspeeder"]10129 - Rebel Snowspeeder[/url] had been on the market for about 3 years (release date 2003), retailing for around 130 euro. After my dark ages, my passion for LEGO mainly focused on Technic, although I was (and still am) a big fan of Star Wars. To make a long story, I didn't get the Snowspeeder. I even skipped the [url="http://brickset.com/sets/10179-1/Ultimate-Collector-s-Millennium-Falcon"]10179 - Millennium Falcon[/url], although I'd rather not talk about that. Hopefully I can correct my worst LEGO decision later this year. In the meantime I have been able to correct my Snowspeeder mistake. For me the Snowspeeder (or T-47 Airspeeder) is one of the iconic Star Wars vehicles, together with the beforementioned Millennium Falcon, AT-AT, X-Wing and Tie Fighter. Lots of other cool and well known vehicles can be added to that list, but these probably end up in the Star Wars Top-5. We haven't seen an official UCS AT-AT yet, but the X-Wing and Tie Fighter both have a very cool UCS model. For now, we will be focussing on the [url="http://brickset.com/sets/75144-1/Snowspeeder"]75144 Snowspeeder[/url]. Lots of Snowspeeder models have been released over the year, but we're talking UCS here! [b]PICTURES[/b] [i]Pictures can be clicked to view hi-res versions. More pictures can be found in my [url="https://www.flickr.com/photos/jimvangulik/albums/72157679155711214"]Flickr album[/url].[/i] [b]DISCLAIMER[/b] [i]This set has been provided by TLG. It's not my goal to promote this set. It's my goal to give you an honest opinion about it. Therefore, the opinion in this review is my own and is in no way linked to TLG.[/i]SET INFORMATION
Number: [b]75144[/b] Title: [b]Snowspeeder[/b] Theme: [b]Star Wars[/b] Released: [b]2017[/b] Part Count: [b]1703[/b] Box Weight: [b]2529 gr[/b] Box Dimensions: [b]57,5 cm x 37,5 cm x 8,0[/b] Set Price (MSRP): [b]£169.99 / $199.99 / €199,99[/b] Price per Part: [b]£0.100 / $0.117 / €0,117[/b] Links: [url="http://brickset.com/sets/75144-1/Snowspeeder"]Brickset[/url], [url="http://www.bricklink.com/catalogItem.asp?S=75144-1"]Bricklink[/url]THE BOX
The box is the same size as the box for the Tie Fighter and Slave 1, which seems logical, since these sets share more or less the same part count. The front of the box shows the Snowspeeder in actions, with some AT-AT's in the background. This is reminiscent of the iconic battle scene on the planet Hoth. The front of the box also shows a top-down view of the model. Looking at both images, I am really anxious to start building. [url="https://farm3.staticflickr.com/2859/33593515240_dbc187d75b_o.jpg"][img]https://farm3.staticflickr.com/2859/33593515240_556a18c699_c.jpg[/img][/url] [b]BACKSIDE[/b] The backside is filled with lots of smaller images, showing all the functions. Apparently, the Snowspeeder has a lot of functionality. Hopefully this will result in some playability. [url="https://farm3.staticflickr.com/2852/33978619625_bfeeea5705_o.jpg"][img]https://farm3.staticflickr.com/2852/33978619625_3f8835eab9_c.jpg[/img][/url] [b]SIDE[/b] One of the sides shows the dimensions of the finished model. It will be 30cm wide and 40 cm long, so it will more or less cover two A4 (or Letter) sheets. Unlike the previous UCS Snowspeeder, this set comes with two minifigures, designated Rebel Snowspeeder Pilot and Rebel Snowspeeder Gunner. [url="https://farm3.staticflickr.com/2937/33165623143_585b9a1880_o.jpg"][img]https://farm3.staticflickr.com/2937/33165623143_a8168fe93c_c.jpg[/img][/url]CONTENTS OF THE BOX
After turning over the box, you will find this heap of bags and parts. [url="https://farm3.staticflickr.com/2809/33978620025_3d123536c6_o.jpg"][img]https://farm3.staticflickr.com/2809/33978620025_b0649e964d_c.jpg[/img][/url] [list] [*]1 x Bound book [*]1 x Sticker sheet [*]13 x Numbered bag [*]1 x Black tile [*]1 x Grey plate [/list] [b]SEALED BOOK AND STICKER SHEET[/b] [url="https://farm3.staticflickr.com/2851/33593518190_b113ac8c6c_o.jpg"][img]https://farm3.staticflickr.com/2851/33593518190_7c6efb5273_c.jpg[/img][/url] [b]STICKER SHEET[/b] [url="https://farm3.staticflickr.com/2941/33593518050_ef5b858efd_o.jpg"][img]https://farm3.staticflickr.com/2941/33593518050_c8cc231835_c.jpg[/img][/url] [b]BOUND BOOK[/b] [url="https://farm3.staticflickr.com/2937/33165623793_3ea1649568_o.jpg"][img]https://farm3.staticflickr.com/2937/33165623793_b81c889574_c.jpg[/img][/url] [b]BAGS[/b] The box contains 13 bags, numbered from 1 to 13. This means each bag represents a separate step during the build. [url="https://farm3.staticflickr.com/2814/33593515550_f53a23e6e0_o.jpg"][img]https://farm3.staticflickr.com/2814/33593515550_2971230136_m.jpg[/img][/url][url="https://farm3.staticflickr.com/2923/33978619405_484fb7ccf0_o.jpg"][img]https://farm3.staticflickr.com/2923/33978619405_8fd9a31ffb_m.jpg[/img][/url][url="https://farm3.staticflickr.com/2914/33593515850_452cc60823_o.jpg"][img]https://farm3.staticflickr.com/2914/33593515850_8bcb60c796_m.jpg[/img][/url] [url="https://farm3.staticflickr.com/2838/33593516210_e7c08111a1_o.jpg"][img]https://farm3.staticflickr.com/2838/33593516210_c5c0ffab23_m.jpg[/img][/url][url="https://farm4.staticflickr.com/3929/33978620555_0306c194d4_o.jpg"][img]https://farm4.staticflickr.com/3929/33978620555_f220765853_m.jpg[/img][/url][url="https://farm3.staticflickr.com/2832/33593516320_c165aae2d7_o.jpg"][img]https://farm3.staticflickr.com/2832/33593516320_6e12f7a3d7_m.jpg[/img][/url] [url="https://farm4.staticflickr.com/3829/33593516500_91fea88465_o.jpg"][img]https://farm4.staticflickr.com/3829/33593516500_f3d8f3779f_m.jpg[/img][/url][url="https://farm3.staticflickr.com/2946/33593516630_aaf413f5f0_o.jpg"][img]https://farm3.staticflickr.com/2946/33593516630_9361777db6_m.jpg[/img][/url][url="https://farm3.staticflickr.com/2925/33593516840_914173b02f_o.jpg"][img]https://farm3.staticflickr.com/2925/33593516840_8f1f8663ab_m.jpg[/img][/url] [url="https://farm3.staticflickr.com/2875/33165623043_4cd3b3dbd6_o.jpg"][img]https://farm3.staticflickr.com/2875/33165623043_d56aee4ceb_m.jpg[/img][/url][url="https://farm3.staticflickr.com/2895/33593516940_c02bc5875b_o.jpg"][img]https://farm3.staticflickr.com/2895/33593516940_e8a9b60924_m.jpg[/img][/url][url="https://farm3.staticflickr.com/2915/33593517180_23ef3c21a4_o.jpg"][img]https://farm3.staticflickr.com/2915/33593517180_4dda77aaba_m.jpg[/img][/url] [url="https://farm3.staticflickr.com/2915/33593517260_2d3d4fc11b_o.jpg"][img]https://farm3.staticflickr.com/2915/33593517260_878ba35d2d_m.jpg[/img][/url] [b]PLATE AND TILE[/b] The tile (16x8) for the UCS plaque and a light bluish grey plate (16x8) are provided loose in the box. [url="https://farm3.staticflickr.com/2862/33593517390_a41d8bafe2_o.jpg"][img]https://farm3.staticflickr.com/2862/33593517390_1ccd8b321b_n.jpg[/img][/url][url="https://farm4.staticflickr.com/3929/33593517630_ff36fe7982_o.jpg"][img]https://farm4.staticflickr.com/3929/33593517630_a118d02327_n.jpg[/img][/url]HIGHLIGHTED PARTS
This section describes the unique and/or highlighted parts. Other than that, this set doesn't contain a lot of special or new parts. [b]CANOPY[/b] Like the [url="https://brickset.com/sets/10240-1/Red-Five-X-wing-Starfighter"]10240 - Red Five X-Wing Starfighter[/url], this model introduces a new unique Canopy part. [url="https://farm3.staticflickr.com/2831/33903704101_6865eeb400_o.jpg"][img]https://farm3.staticflickr.com/2831/33903704101_3b0490e0d2_n.jpg[/img][/url][url="https://farm4.staticflickr.com/3931/33190507904_2439a7c635_o.jpg"][img]https://farm4.staticflickr.com/3931/33190507904_9a98f1f1b6_n.jpg[/img][/url] [b]PART LIST[/b] Here's the complete part list, consisting of 1703 parts. [url="https://farm3.staticflickr.com/2948/33593518450_912b9dd867_o.jpg"][img]https://farm3.staticflickr.com/2948/33593518450_50d0b90359_n.jpg[/img][/url][url="https://farm4.staticflickr.com/3938/33593514930_84693702b4_o.jpg"][img]https://farm4.staticflickr.com/3938/33593514930_e6f41fe5c7_n.jpg[/img][/url]MINIFIGURES
This set contains two minifigures, designated Rebel Snowspeeder Pilot and Rebel Snowspeeder Gunner. Each of the minifigs has two different faces, a grin and a somewhat scared face. [url="https://farm3.staticflickr.com/2911/33876141032_fff55eed70_o.jpg"][img]https://farm3.staticflickr.com/2911/33876141032_54fb6c7e15_c.jpg[/img][/url] Both torsos are identical. The only difference between the minifigs is the type of helmet. [url="https://farm3.staticflickr.com/2856/33843356042_a268442e55_o.jpg"][img]https://farm3.staticflickr.com/2856/33843356042_12ae8ea831_c.jpg[/img][/url]THE BUILD
The build consists of 13 steps, corresponding to the 13 numbered bags. But before the build commences, there are several pages with lots of cool content about the design process. [url="https://farm3.staticflickr.com/2882/33593518770_9b1fbafd5b_o.jpg"][img]https://farm3.staticflickr.com/2882/33593518770_c899f07e9e_c.jpg[/img][/url] [b]STEP 1: REAR COCKPIT SECTION[/b] The build starts with the rear section of the cockpit and fuselage, using the parts below. [url="https://farm3.staticflickr.com/2909/33165623973_dd78efc634_o.jpg"][img]https://farm3.staticflickr.com/2909/33165623973_5be494a155_c.jpg[/img][/url] The end result of step 1 is shown in the image below. As usual with UCS models there is some color vomit comprising the innards of the model, although it seems to be less vomit than other UCS models. [url="https://farm4.staticflickr.com/3954/33823690372_0ba59d81d0_o.jpg"][img]https://farm4.staticflickr.com/3954/33823690372_d117dbca79_c.jpg[/img][/url] [b]STEP 2: FRONT COCKPIT SECTION[/b] Next you will build the front section of the cockpit and fuselage. [url="https://farm3.staticflickr.com/2827/33981221395_dd9f970ded_o.jpg"][img]https://farm3.staticflickr.com/2827/33981221395_5d3618e4da_c.jpg[/img][/url] This is where the front and rear section team up. The hinge in the middle is where the front landing gear is connected. Although "landing gear" is a bit exaggerated. [url="https://farm3.staticflickr.com/2896/33981221525_5949487a01_o.jpg"][img]https://farm3.staticflickr.com/2896/33981221525_2049fb1aff_c.jpg[/img][/url] When the front and rear are connected, the cockpit and fuselage are taking shape. [url="https://farm3.staticflickr.com/2848/33981221745_63cd23ed2d_o.jpg"][img]https://farm3.staticflickr.com/2848/33981221745_148766bee3_c.jpg[/img][/url] This is how the bottom of the fuselage looks. [url="https://farm4.staticflickr.com/3933/33981221885_5010edaef6_o.jpg"][img]https://farm4.staticflickr.com/3933/33981221885_9e81519ee2_c.jpg[/img][/url] [b]STEP 3: COMPLETING THE FUSELAGE[/b] In this step more parts will be added to the fuselage. [url="https://farm3.staticflickr.com/2921/33981221625_95ce973b12_o.jpg"][img]https://farm3.staticflickr.com/2921/33981221625_2be2964e6b_c.jpg[/img][/url] Upon completion of this step, the cockpit with control panels is almost finished. [url="https://farm4.staticflickr.com/3684/33981222035_faf7bb58a7_o.jpg"][img]https://farm4.staticflickr.com/3684/33981222035_295e49cb05_c.jpg[/img][/url] The front of the cockpit contains two 2x1 slopes and a 2x2 slope. The 2x2 slope, like the ones in the rear, are printed, while the 2x1 slopes are using stickers. You'd expect a UCS model to have printed 2x1 slopes as well. In the rear you can see an axle protruding the fuselage. It's connected to the [url="https://www.bricklink.com/v2/catalog/catalogitem.page?P=30552&idColor=11#T=C&C=11"]Hinge Cylinder[/url] in the back of the cockpit. This is the mechanism for the gunner to operate the rear mounted gun. [url="https://farm4.staticflickr.com/3933/33981222175_d749c85c15_o.jpg"][img]https://farm4.staticflickr.com/3933/33981222175_3d8c9453ea_c.jpg[/img][/url] [b]STEP 4: COCKPIT INTERIOR AND NOSE[/b] You can already see some of the orange parts, used to build the nose of the vehicle. [url="https://farm3.staticflickr.com/2881/33843354932_f2dc768f5d_o.jpg"][img]https://farm3.staticflickr.com/2881/33843354932_094011e6d5_c.jpg[/img][/url] Here's the finished cockpit, where you can clearly see the slopes with and without stickers. [url="https://farm3.staticflickr.com/2903/33843355312_04d5f1d2f0_o.jpg"][img]https://farm3.staticflickr.com/2903/33843355312_b34d2c137f_c.jpg[/img][/url] The finished fuselage with cockpit and interior. Two seats, one facing forward and one facing rearward, for the pilot and gunner respectively. [url="https://farm3.staticflickr.com/2839/34001023835_85407f8cc2_o.jpg"][img]https://farm3.staticflickr.com/2839/34001023835_2280280f85_c.jpg[/img][/url] The front wing is attached to the fuselage using two ball joints. [url="https://farm3.staticflickr.com/2841/33843355552_19279cb3f0_o.jpg"][img]https://farm3.staticflickr.com/2841/33843355552_807095a18e_c.jpg[/img][/url] The little side wings need to be positioned when both main wings are finished. [url="https://farm3.staticflickr.com/2908/33157615904_f2f209d26e_o.jpg"][img]https://farm3.staticflickr.com/2908/33157615904_5aab4cdd37_c.jpg[/img][/url] At the rear of the cockpit you can see the controls for the rear (harpoon) gun, consisting of a steer and a screen with aim assist. [url="https://farm3.staticflickr.com/2847/33843355702_8c8f90ab75_o.jpg"][img]https://farm3.staticflickr.com/2847/33843355702_d1f2481dbe_c.jpg[/img][/url] The video below shows the controls for the rear gun in action. [media][/media] [b]STEP 5: UCS STAND[/b] Mostly black parts. This can only mean one thing. [url="https://farm3.staticflickr.com/2834/33157618944_6706b51f49_o.jpg"][img]https://farm3.staticflickr.com/2834/33157618944_7ca3dff9ea_c.jpg[/img][/url] Yup, it's the stand commonly used for UCS models. [url="https://farm3.staticflickr.com/2926/33157617204_c06a0df62b_o.jpg"][img]https://farm3.staticflickr.com/2926/33157617204_2130cd2960_c.jpg[/img][/url] [b]STEP 6: BOTTOM WINGS AND AIR BRAKES[/b] The paper container is packing two elastic bands. [url="https://farm4.staticflickr.com/3932/33157616764_6f96407f37_o.jpg"][img]https://farm4.staticflickr.com/3932/33157616764_437858931c_c.jpg[/img][/url] The two bottom wings are attached with hinges, but they are kept in place using elastic bands. I am not a big fan of these bands. They tend to turn brittle after a couple of years. [url="https://farm3.staticflickr.com/2891/33157617524_a0c936178c_o.jpg"][img]https://farm3.staticflickr.com/2891/33157617524_c8bdc17ebf_c.jpg[/img][/url] The flaps on the backside are used to manoeuvre the vehicle. [url="https://farm3.staticflickr.com/2819/33843355132_74bc38c177_o.jpg"][img]https://farm3.staticflickr.com/2819/33843355132_60455a3852_c.jpg[/img][/url] [b]STEP 7: RIGHT WING[/b] A collection of plates used to build the right wing. [url="https://farm3.staticflickr.com/2928/33843356642_c1a4280552_o.jpg"][img]https://farm3.staticflickr.com/2928/33843356642_9781249d4b_c.jpg[/img][/url] The complete wing is pretty big and it has a sturdy feel to it. [url="https://farm3.staticflickr.com/2850/33157617694_5bd4d48b9c_o.jpg"][img]https://farm3.staticflickr.com/2850/33157617694_e82132a83c_c.jpg[/img][/url] [b]STEP 8: RIGHT WING LASER AND ENGINE I[/b] Parts for building part of the laser and engine. [url="https://farm3.staticflickr.com/2931/33157617904_c7229edcb3_o.jpg"][img]https://farm3.staticflickr.com/2931/33157617904_e57fec6961_c.jpg[/img][/url] At the rear you can already see the mechanism to operate the air brakes. [url="https://farm3.staticflickr.com/2832/33157616124_1fb1fed750_o.jpg"][img]https://farm3.staticflickr.com/2832/33157616124_858f6164c9_c.jpg[/img][/url] [b]STEP 9: RIGHT WING LASER AND ENGINE II[/b] These parts are used to finish the laser cannons and air brakes. [url="https://farm4.staticflickr.com/3955/34001025255_f34a142b9f_o.jpg"][img]https://farm4.staticflickr.com/3955/34001025255_4a75edb745_c.jpg[/img][/url] Here you can see the complete right wing. It sure does look cool. [url="https://farm3.staticflickr.com/2856/33157618614_1f3376174a_o.jpg"][img]https://farm3.staticflickr.com/2856/33157618614_59ef0cbb45_c.jpg[/img][/url] The wing is attached using the hinges on the fuselage. [url="https://farm3.staticflickr.com/2908/34001025565_6bdb3ce9b5_o.jpg"][img]https://farm3.staticflickr.com/2908/34001025565_5585f86ea3_c.jpg[/img][/url] [b]STEP 10, 11 AND 12: LEFT WING[/b] The next three steps (10, 11 and 12) are (mirrored) duplicates of steps 7, 8 and 9. Except for the 4x2 slope, the left wing is an exact copy of the right wing. [url="https://farm3.staticflickr.com/2855/33221092653_5200f83c20_o.jpg"][img]https://farm3.staticflickr.com/2855/33221092653_a58823c4fd_c.jpg[/img][/url] Attaching the left wing to the vehicle can be a bit tricky. You need to firmly grip the speeder to be able to attach the wing. This can result in some parts coming loose. When you do succeed, you will see an almost finished model. [url="https://farm3.staticflickr.com/2918/33221093773_497091fb6a_o.jpg"][img]https://farm3.staticflickr.com/2918/33221093773_03fa72cbc9_c.jpg[/img][/url] [b]STEP 13: CANOPY[/b] These are the remaining parts to finish the model. [url="https://farm3.staticflickr.com/2906/33903698751_0b15612b0f_o.jpg"][img]https://farm3.staticflickr.com/2906/33903698751_3400c896a8_c.jpg[/img][/url] They are used to build the Canopy, rear mounted laser blaster and the heat radiator fins. From [url="http://starwars.wikia.com/wiki/T-47_airspeeder"]wookieepedia[/url]: [i]Hoth's extreme cold temperatures were too severe for these craft; the power generators would lock up since they ran hot, requiring a large bank of heat radiator fins for essential cooling. Rebel technicians modified the T-47 airspeeder by insulating each radiator fin with side panels to decrease the heat exchange in order to better suit the new environment.[/i] The canopy is decorated with several stickers. Although, we obviously would love to see a printed canopy, I find this solution much more elegant than the one used for the X-wing. [url="https://farm3.staticflickr.com/2947/33876140792_400ff8df2e_o.jpg"][img]https://farm3.staticflickr.com/2947/33876140792_fcd7fb72a6_c.jpg[/img][/url] The rear mounted gun is operated from the cockpit. [url="https://farm3.staticflickr.com/2921/33903704361_5c333239b0_o.jpg"][img]https://farm3.staticflickr.com/2921/33903704361_08058766f5_c.jpg[/img][/url] The canopy can be opened to reveal the interior of the cockpit. [url="https://farm3.staticflickr.com/2849/33190508094_1a6e847dc0_o.jpg"][img]https://farm3.staticflickr.com/2849/33190508094_1c6128124d_c.jpg[/img][/url] The sides of the canopy are made of two large windshields, also found in the Mini. [url="https://farm4.staticflickr.com/3935/33903704241_2f6bdf9333_o.jpg"][img]https://farm4.staticflickr.com/3935/33903704241_524d7a6e14_c.jpg[/img][/url]COMPLETED MODEL
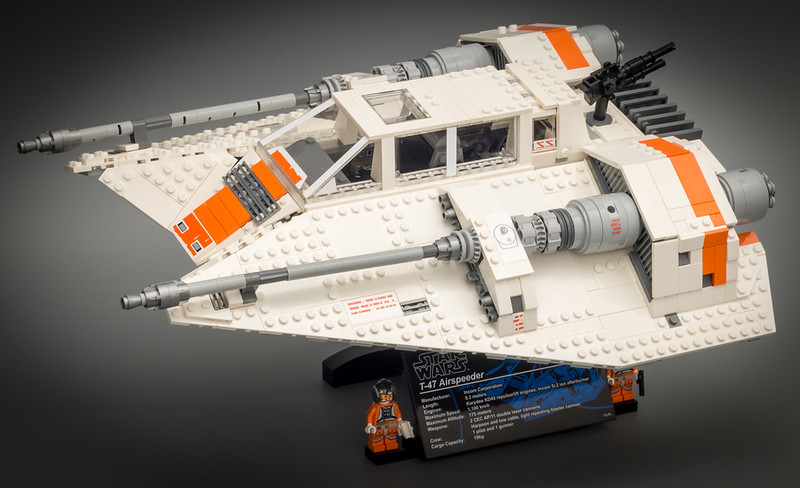
After several hours of enjoyable building time the model is completed. I absolutely love the looks on this model. Granted, I am a pretty big fan of the T47 Airspeeder. Lots of stickers are used, which is always a point of debate. I'd rather see printed parts on UCS models, even if that means the price will increase. I simply adds value to the model. [url="https://farm3.staticflickr.com/2902/33876141962_0c1ba67ce5_o.jpg"][img]https://farm3.staticflickr.com/2902/33876141962_98d16a1345_c.jpg[/img][/url] Here's the completed model placed on its stand. [url="https://farm3.staticflickr.com/2832/33190510334_138e41be8b_o.jpg"][img]https://farm3.staticflickr.com/2832/33190510334_343a1d6839_c.jpg[/img][/url] [b]REAR[/b] The rear of the vehicle, showing the characteristic cooling fins. [url="https://farm4.staticflickr.com/3938/33190511394_3211f1e5bd_o.jpg"][img]https://farm4.staticflickr.com/3938/33190511394_2a4f292045_c.jpg[/img][/url] The vehicle also looks stunning when seen from the rear. [url="https://farm3.staticflickr.com/2865/33903704901_97f71043e5_o.jpg"][img]https://farm3.staticflickr.com/2865/33903704901_f71aa110bd_c.jpg[/img][/url] [b]FRONT[/b] Two big laser blaster cannons and the peculiar setup of the wings, give this vehicle its distinctive look. [url="https://farm3.staticflickr.com/2807/33876141762_2f3d3536b5_o.jpg"][img]https://farm3.staticflickr.com/2807/33876141762_45ab4792ce_c.jpg[/img][/url] [b]SIDE[/b] One of the Minifigs is left in the dark. I guess he needs to accept the fact that he is playing the second fiddle. [url="https://farm3.staticflickr.com/2922/33221091023_b1c1f31efd_o.jpg"][img]https://farm3.staticflickr.com/2922/33221091023_29527f9402_c.jpg[/img][/url] [b]BOTTOM[/b] The bottom view where you can clearly see the ice skating minifig accessories. I like this detail, but they tend to fall of easily. [url="https://farm3.staticflickr.com/2936/33958978671_ae1d90941e_o.jpg"][img]https://farm3.staticflickr.com/2936/33958978671_12048fb44e_c.jpg[/img][/url] https://youtu.be/vGmSCMb3UMo [b]ADDITIONAL[/b] Here are some additional pictures for your enjoyment. [url="https://farm3.staticflickr.com/2849/33190513004_0990f901f2_o.jpg"][img]https://farm3.staticflickr.com/2849/33190513004_44b190fc12_c.jpg[/img][/url] [url="https://farm4.staticflickr.com/3933/33190513574_c5a80da26e_o.jpg"][img]https://farm4.staticflickr.com/3933/33190513574_c8efa0a44c_c.jpg[/img][/url] [url="https://farm4.staticflickr.com/3939/33221090063_a7e2726df4_o.jpg"][img]https://farm4.staticflickr.com/3939/33221090063_064bbe99a2_c.jpg[/img][/url] [url="https://farm4.staticflickr.com/3952/33221091813_98c4fa93d9_o.jpg"][img]https://farm4.staticflickr.com/3952/33221091813_f89fdb5021_c.jpg[/img][/url] [url="https://farm3.staticflickr.com/2813/33221090303_b747811f15_o.jpg"][img]https://farm3.staticflickr.com/2813/33221090303_8754ee5d93_c.jpg[/img][/url]FEATURES AND FUNCTIONS
The Snowspeeder is part of the Ultimate Collector's Series, which mean that it's mostly a display model. This model does however pack a few functions. [list] [*]Canopy opens up, revealing the cockpit [*]Rear set has controls to operate the rear mounted (harpoon) gun [*]Turn laser cannon to operate the air brakes [*]Manually adjustable flaps [*]Manually operated front landing gear [/list]B-MODEL
There's no B-model for this set, which is in line with the other UCS sets.SUMMARY
So, what do I think of this model? Obviously, this version will be compared to the old UCS version and people will ask whether this version is better. I don't think it's really fair to compare both models, given the number of years in between. LEGO has evolved since the previous version, so yeah, this model looks better. Whether it's actually better...I don't know. And to be honest, I don't really care. What I do care about, is that this is a fantastic set! After the Hoth playset of last year, it was time for TLG to release a proper UCS set. This Snowspeeder definitely fits that bill. The build is enjoyable, even though it is somewhat repetitive. After all, three of the 13 steps are duplicates. This didn't botter me at all. If I had to mention something negative, it would be the rubber bands holding the lower part of the wings in place. Oh, and it includes two blaster pistols! :laugh: [b]PROS[/b] [list] [*]Awesome looking iconic model [*]Several functions [*]New canopy part [*]Includes two blaster pistols [/list] [b]CONS[/b] [list] [*]Attachments (wings etc) are a bit flimsy [*]Elastic bands [/list]SCORE
How do I rate this set? [b][color=#800000][size=5]9[/size][/color][/b] [b]DESIGN[/b] [img]https://farm9.staticflickr.com/8669/16218294336_cc3a1c982b_m.jpg[/img] [size=3]Stunning.[/size] [b][color=#800000][size=5]8[/size][/color][/b] [b]BUILDING EXPERIENCE[/b] [img]https://farm9.staticflickr.com/8580/16244195165_2b8d3e102f_m.jpg[/img] [size=3]Enjoyable build, although the bottom is somewhat flimsy.[/size] [b][color=#800000][size=5]7[/size][/color][/b] [b]FEATURES[/b] [img]https://farm8.staticflickr.com/7523/15624316853_d44ef20b33_m.jpg[/img] [size=3]Acceptable for a UCS display model.[/size] [b][color=#800000][size=5]7[/size][/color][/b] [b]PLAYABILITY[/b] [img]https://farm8.staticflickr.com/7523/15624316853_d44ef20b33_m.jpg[/img] [size=3]UCS sets hardly provide any playability.[/size] [b][color=#800000][size=5]7[/size][/color][/b] [b]PARTS[/b] [img]https://farm8.staticflickr.com/7523/15624316853_d44ef20b33_m.jpg[/img] [size=3]Contains a wide variety of (mostly) common parts.[/size] [b][color=#800000][size=5]9[/size][/color][/b] [b]VALUE FOR MONEY[/b] [img]https://farm9.staticflickr.com/8669/16218294336_cc3a1c982b_m.jpg[/img] [size=3]Must have for every fan[/size] [b][color=#800000][size=6]7,8[/size][/color][/b] [b][color=#000000][size=4]WORTHY SUCCESSOR[/size][/color][/b]FINAL WORDS
https://youtu.be/BHNh4jDIKyQ http://www.eurobricks.com/forum/index.php?/forums/topic/40273-review-10129-ucs-snowspeeder/Discussion about this set can be found here.