Review - 42050 - Drag Racer
Review

REVIEW - 42050 - DRAG RACER
HEADER
[url="https://farm6.staticflickr.com/5637/22626790523_50c897b9c8_o.jpg"][img]https://farm6.staticflickr.com/5637/22626790523_927c616196_c.jpg[/img][/url]INTRODUCTION
And then there's this...arguably the most controversial set of 2016. Upon seeing the first pictures, excitement about a Drag Racer quickly got replaced with a "what's this supposed to be" feeling. Some people still like it, some think it's the most ugly set in the world. Others claim it's what's called a Funny Car and it's supposed to look ugly. I can recommend reading the [url="https://en.wikipedia.org/wiki/Funny_Car"]Wiki article on Funny Cars[/url]. This set does contain two of the "Tumbler Tires", which does make it interesting for some people. Is it interesting enough to buy two sets to acquire four tires. That will depend on the price and what the set has to offer besides the tires. I'm glad I got a chance to review this set, because the first glimpse didn't make me very enthusiastic. Since I already have four of the tumbler tires, that would not be a reason for me to buy it. The best thing to do is to switch to neutral and start exploring what this set has to offer. [i]Note: All images can be clicked for hi-res versions.[/i]SET INFORMATION
Number: [b]42050[/b] Title: [b]Drag Racer[/b] Theme: [b]Technic[/b] Released: [b]2016[/b] Part Count: [b]647[/b] Box Weight: [b]1089 gr[/b] Box Dimensions: [b]37,9 cm x 25,8 cm x 9,2 cm[/b] Set Price (MSRP): [b]€ 59,99[/b] Price per Part: [b]€ 0,093[/b] Links: [url="http://brickset.com/sets/42050-1/Drag-Racer"]Brickset[/url], [url="http://www.bricklink.com/catalogItem.asp?S=42050-1"]Bricklink[/url]THE BOX
The box shows the Drag Racer in the middle of a wheelie. The wheelie functionality has caused quite some confusion and discussion. Is this car able to do a wheelie?! Without any assisting contraptions?! The top right shows a bar behind the car, seemingly to limit the cars vertical movement. [url="https://farm1.staticflickr.com/716/23308658181_31c4336b6d_o.jpg"][img]https://farm1.staticflickr.com/716/23308658181_4eed52c7f6_c.jpg[/img][/url] [b]BACKSIDE[/b] The backside of the box confirms the car's ability to do a wheelie. However, it seems there's a contraption in the bottom of the chassis helping the car lift in the air. That does feel like cheating. The set can be motorised using PF elements. The battery box attached to the end of the car could act as a counter weight, eliminating the need for the contraption in the bottom of the chassis. Looking at the picture on the box, it looks like the battery box alone is not enough. More on that later. The left lower corner of the backside shows the B-model, an actual Dragster, called Supercharged Dragster. Many have claimed the B-model looks better than the A-model. [url="https://farm1.staticflickr.com/657/22448230953_0b04ace683_o.jpg"][img]https://farm1.staticflickr.com/657/22448230953_80b27fca74_c.jpg[/img][/url]CONTENT OF THE BOX
The box contains: [list] [*]1 Instruction Booklet [*]1 Sticker Sheet [*]4 Wheels [*]5 Bags [/list] [b]INSTRUCTION BOOKLET[/b] The instruction booklet for the main model. No booklet for the alternate model. [url="https://farm1.staticflickr.com/759/22958047740_3f9c1198ee_o.jpg"][img]https://farm1.staticflickr.com/759/22958047740_cec94d6486_c.jpg[/img][/url] [b]STICKER SHEET[/b] Looking at this sticker sheet, I wonder why TLG doesn't insert the sticker sheet in the booklet. That would prevent damage and rolling up. [url="https://farm6.staticflickr.com/5677/22885945359_4fe4b156f9_o.jpg"][img]https://farm6.staticflickr.com/5677/22885945359_b7b8fcf511_c.jpg[/img][/url] [b]TIRES[/b] Two special tires, which we will discuss shortly. [url="https://farm6.staticflickr.com/5825/22958046830_f7fc2e5c11_o.jpg"][img]https://farm6.staticflickr.com/5825/22958046830_14ec56d9ea_c.jpg[/img][/url] [b]BAGS[/b] A total of five bags containing the rest of the parts. [url="https://farm6.staticflickr.com/5700/22885943689_db4408d257_o.jpg"][img]https://farm6.staticflickr.com/5700/22885943689_7ccf0c43ce_n.jpg[/img][/url] [url="https://farm6.staticflickr.com/5748/22626788963_11655a1aa9_o.jpg"][img]https://farm6.staticflickr.com/5748/22626788963_25c6f885fd_n.jpg[/img][/url] [url="https://farm1.staticflickr.com/777/22859736267_6ffd6d737d_o.jpg"][img]https://farm1.staticflickr.com/777/22859736267_f25f333a37_n.jpg[/img][/url] [url="https://farm1.staticflickr.com/587/22958047510_31721cec28_o.jpg"][img]https://farm1.staticflickr.com/587/22958047510_8940d67262_n.jpg[/img][/url] [url="https://farm6.staticflickr.com/5728/22625452164_48347071ea_o.jpg"][img]https://farm6.staticflickr.com/5728/22625452164_18cd958f89_n.jpg[/img][/url]HIGHLIGHED PARTS
This section describes the new and/or interesting parts. [b]BLUE 5x3 BENT PANEL[/b] These new Bent Panels seem to be very suited to make fenders/wheel arches and seats. [url="https://farm1.staticflickr.com/602/22938027339_42c1210e2d_o.jpg"][img]https://farm1.staticflickr.com/602/22938027339_6c068869d3_n.jpg[/img][/url] [b]3L AXLE WITH STOP[/b] We started with a [url="http://alpha.bricklink.com/pages/clone/catalogitem.page?P=55013&name=Technic,%20Axle%208%20with%20Stop&category=%5BTechnic,%20Axle%5D#T=C"]8L Axle with Stop[/url] in 2006, followed by the [url="http://alpha.bricklink.com/pages/clone/catalogitem.page?P=87083&name=Technic,%20Axle%204%20with%20Stop&category=%5BTechnic,%20Axle%5D#T=C"]4L Axle with Stop[/url] in 2010. The 4L seems to be around for ages, but it was introduced in 2010, which was surprising to find out. In 2014 TLG released the [url="http://alpha.bricklink.com/pages/clone/catalogitem.page?P=15462&name=Technic,%20Axle%205%20with%20Stop&category=%5BTechnic,%20Axle%5D#T=C"]5L Axle with Stop[/url] and this we get a new 3L Axle with Stop. [url="https://farm1.staticflickr.com/655/23305923665_1c96ebf79b_o.jpg"][img]https://farm1.staticflickr.com/655/23305923665_7770945891_n.jpg[/img][/url] [b]7L AXLE IN YELLOW[/b] The [url="http://alpha.bricklink.com/pages/clone/catalogitem.page?id=38562#T=C"]7L Axle[/url] has never been released in yellow before. This year TLG surprised us with releasing axles in different colors, like yellow, red and orange. This set only contains a yellow 7L Axle, but you can checkout my other reviews to see which other axles have been (re)released. This 7L Axle is also used in the Police Interceptor. [url="https://farm6.staticflickr.com/5696/22938027479_d43e8436f3_o.jpg"][img]https://farm6.staticflickr.com/5696/22938027479_45904d56fc_n.jpg[/img][/url] [b]6L AXLE IN RED[/b] While the Red [url="http://alpha.bricklink.com/pages/clone/catalogitem.page?id=678#T=C"]6L Axle[/url] isn't new, it's only used in a [url="http://www.bricklink.com/catalogItemIn.asp?P=3706&in=S"]couple of sets[/url] before. [url="https://farm1.staticflickr.com/681/23010132090_b63c15152c_o.jpg"][img]https://farm1.staticflickr.com/681/23010132090_da2ca31d80_n.jpg[/img][/url] [b]BLACK 7L SOFT AXLES[/b] For the layman this seems a common part, but the [url="http://alpha.bricklink.com/pages/clone/catalogitem.page?id=10736"]7L Soft Axle[/url] actually has never been released in black before. Combined with the re-release of the [url="http://alpha.bricklink.com/pages/clone/catalogitem.page?id=561"]19L Soft Axle[/url] in black, this will open up lots of possibilities. For those of you thinking you've read this text before; you are right, the new Display Team Jet contains these new 7L Soft Axles too. [url="https://farm1.staticflickr.com/612/23127753455_2ec92c52bf_o.jpg"][img]https://farm1.staticflickr.com/612/23127753455_53467a617d_n.jpg[/img][/url] [b]BLACK 16L SOFT AXLE[/b] At first I thought this was a new 15L Soft Axle, but upon closer inspection, it appeared to be a [url="http://alpha.bricklink.com/pages/clone/catalogitem.page?P=32202&name=Hose,%20Soft%20Axle%2016&category=%5BHose,%20Soft%20Axle%5D#T=C"]16L Flex Axle[/url]. It isn't a very common part though, since it only appeared in the [url="http://brickset.com/sets/42026-1/Black-Champion-Racer"]42026 - Black Champion Racer[/url] from 2014. [url="https://farm1.staticflickr.com/682/23305923885_aa6e9b7074_o.jpg"][img]https://farm1.staticflickr.com/682/23305923885_69fcdb1969_n.jpg[/img][/url] [b]1x9 BENT LINK[/b] Not a very rare part, but you don't see the [url="http://alpha.bricklink.com/pages/clone/catalogitem.page?P=64451&idColor=85#T=C&C=85"]1x9 BENT LINK[/url] every day. [url="https://farm1.staticflickr.com/728/22678801333_62c7a11070_o.jpg"][img]https://farm1.staticflickr.com/728/22678801333_5ca5976f9e_n.jpg[/img][/url] [b]MEDIUM AZURE BLUE PANELS AND [/b] Since I haven't built any of the sets containing Medium Blue, it took me some time to notice that this is a totally different color. I am not a big fan of Medium Blue, since it looks dull. Medium Azure on the other hand looks fantastic. It's very vibrant. Hopefully TLG will continue using this Blue in the years to come. [url="https://farm1.staticflickr.com/666/23197632952_592d60ca1d_o.jpg"][img]https://farm1.staticflickr.com/666/23197632952_2b7e9ea6e9_c.jpg[/img][/url] [b]BLACK PANELS[/b] A modest collection of Black panels. [url="https://farm1.staticflickr.com/676/23197633362_28e68b539f_o.jpg"][img]https://farm1.staticflickr.com/676/23197633362_6d5609ff5d_c.jpg[/img][/url] [b]TUMBLER TIRES/WHEELS[/b] Tires known as Tumber Tires (or Wheels), since they appeared in the [url="http://brickset.com/sets/76023-1/The-Tumbler"]76023 - TheTumbler[/url] for the first time. The official (Bricklink) name is [url="http://alpha.bricklink.com/pages/clone/catalogitem.page?P=18450&idColor=11#T=C&C=11"]Tire 81.6 x 44 R[/url], but that doesn't sound nearly as sexy. When the Tumber was released in 2014 all Technic fans were waiting for an official LEGO Technic set utilizing these wheels. To everyone's surprise, they weren't used in 2015. Luckily they do make their appearance in Technic in 2016. Upon seeing the tires, people immediately suggested a Dragster/Drag Racer, and here it is. Currently the Tires are going for at least 10 euros on Bricklink, so this already contains 20 euros worth of parts. Although I do suspect the prices will go down after the release of tis model. [url="https://farm6.staticflickr.com/5825/22958046830_f7fc2e5c11_o.jpg"][img]https://farm6.staticflickr.com/5825/22958046830_14ec56d9ea_c.jpg[/img][/url] The next video shows a short demonstration of how the Tumbler Tires behave. As you can see in the video, they are prone to slipping. But that only happens when you apply a lot of pressure. The average builder won't notice this behavior. [media]http://www.youtube.com/watch?v=ZG4spnD05nc[/media]PART LIST
This set contains 647 parts, which are shown below. [url="https://farm6.staticflickr.com/5819/22885944669_a4c0f32719_o.jpg"][img]https://farm6.staticflickr.com/5819/22885944669_979ec45f2e_c.jpg[/img][/url]THE BUILD
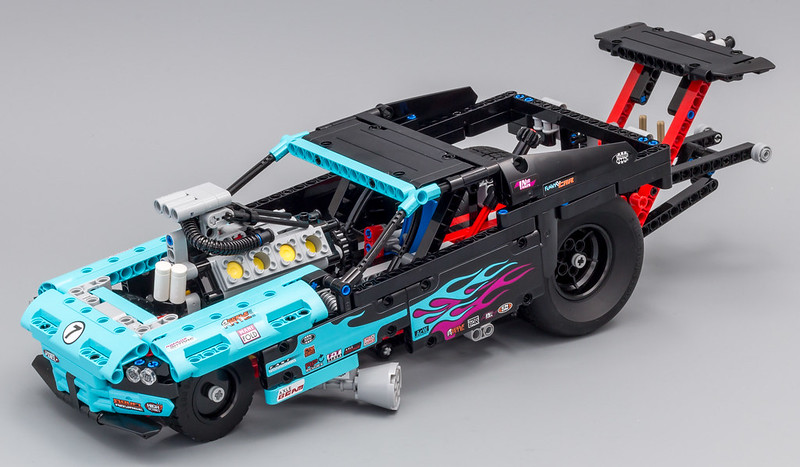
Building the Drag Racer is done in roughly two stages, first you build the chassis, then the bodywork. After the body you will add the spoiler to the chassis, but I'd like to think of two stages in the build. [b]CHASSIS[/b] Building the chassis isn't too complicated. No difficult gearboxes or complex structures. One thing that's worth mentioning is that the V8 is chain driven. That's pretty cool! The end result looks okay. The great thing about the separation of bodywork and chassis, is that you can use this chassis to build your own Funny Car bodywork. [url="https://farm6.staticflickr.com/5783/23081147070_8f3e95a8d1_o.jpg"][img]https://farm6.staticflickr.com/5783/23081147070_de375da5f7_c.jpg[/img][/url] [b]BODYWORK[/b] This is where the controversy originates. Admittedly, the bodywork itself (not connected to the chassis) doesn't look too bad. However, it feels rushed and unfinished, especially the front. For me, this would be a perfect preliminary design, which needs some work to finalize the design. We will attach the bodywork to the chassis in a bit. That's when the peculiar front design really shows. [url="https://farm1.staticflickr.com/723/23350787746_50b04b56c1_o.jpg"][img]https://farm1.staticflickr.com/723/23350787746_2637002c32_c.jpg[/img][/url] The backside of the bodywork isn't too bad. It's simple, but it works. No complaints here. [url="https://farm6.staticflickr.com/5721/23350787886_8d2cca0c7c_o.jpg"][img]https://farm6.staticflickr.com/5721/23350787886_5269723bc3_c.jpg[/img][/url] [b]FINISHED MODEL[/b] I hereby present to you, the Drag Racer! The image below clearly shows why I have a problem with the front design. The front wheel arch is way too square. And I am not particularly fond of the big exhaust pipe and the square hole in the bodywork to make it fit. I would have preferred an exhaust design more like the Getaway Racer, possibly with double pipes on each side. The main problem seems to be the [url="http://alpha.bricklink.com/pages/clone/catalogitem.page?P=11954&idColor=3#T=C&C=3"]11x3 Curved Panel[/url] which is very dominant. Looking at the other supplied parts in Medium Azure, I wonder whether using the Small Panels ([url="http://alpha.bricklink.com/pages/clone/catalogitem.page?P=11946&idColor=1#T=C&C=1"]#21[/url], [url="http://alpha.bricklink.com/pages/clone/catalogitem.page?P=11947&idColor=1#T=C&C=1"]#22[/url]) could lead to a better design. On a more positive note; I really do like Medium Azure! Combined with Black it results in a great color scheme. Looking at the stickers, Purple can be thrown in the mix as well. [url="https://farm6.staticflickr.com/5637/22626790523_50c897b9c8_o.jpg"][img]https://farm6.staticflickr.com/5637/22626790523_927c616196_c.jpg[/img][/url] [url="https://farm6.staticflickr.com/5663/22885946279_4d553196b6_o.jpg"][img]https://farm6.staticflickr.com/5663/22885946279_5a4fa10852_c.jpg[/img][/url] Using the lever on the other side (see video), opens up (or lifts) the bodywork. This is necessary to turn the knob to lift the chassis for the wheelie (see next picture). [url="https://farm6.staticflickr.com/5638/22625453294_64404df680_o.jpg"][img]https://farm6.staticflickr.com/5638/22625453294_4e41da43ee_c.jpg[/img][/url] [url="https://farm6.staticflickr.com/5811/22958049310_1307392cfe_o.jpg"][img]https://farm6.staticflickr.com/5811/22958049310_73c2209faf_c.jpg[/img][/url] So this is the Wheelie mode that generated a lot of discussion. Although this was expected by most members, we secretly hoped there would be a more exotic mechanism for the wheelie. [url="https://farm1.staticflickr.com/577/23253892685_fee22fbefc_o.jpg"][img]https://farm1.staticflickr.com/577/23253892685_e650cbc463_c.jpg[/img][/url] [url="https://farm6.staticflickr.com/5739/23253892785_c0230fde67_o.jpg"][img]https://farm6.staticflickr.com/5739/23253892785_5cde0ff7dd_c.jpg[/img][/url] [b]BACKSIDE[/b] I don't have any real issue with the backside of the car. It's a collection of connected liftarms, but it fits the model. [url="https://farm6.staticflickr.com/5640/22859738457_219a042f6f_o.jpg"][img]https://farm6.staticflickr.com/5640/22859738457_2f22edb105_c.jpg[/img][/url] [b]BOTTOM[/b] As you can see there's no differential between the rear wheels. I'll let you figure out how the drivetrain is connected to the V8 :wink: [url="https://farm6.staticflickr.com/5635/22859738307_991e1f33fc_o.jpg"][img]https://farm6.staticflickr.com/5635/22859738307_fbf26da689_c.jpg[/img][/url] [b]FRONT AND BACK[/b] Two additional images, one of the front and one of the back of the car. [url="https://farm1.staticflickr.com/707/23227755936_99d175cf74_o.jpg"][img]https://farm1.staticflickr.com/707/23227755936_358646926e_n.jpg[/img][/url] [url="https://farm6.staticflickr.com/5626/22885946599_1a352aa953_o.jpg"][img]https://farm6.staticflickr.com/5626/22885946599_fbf26da689_n.jpg[/img][/url] [b]VIDEO[/b] The video below shows a short overview of the model. [media]http://www.youtube.com/watch?v=P4Xjzd610Hg[/media]FUNCTIONS AND FEATURES
This model has the following features: [list] [*]Steering via Hand of God [*]Lifting the bodywork [*]Switching to wheelie mode [*]Chain driven fake engine [/list] [b]VIDEO OF THE CHASSIS FUNCTIONS[/b] The video below demonstrates the functions of the chassis. [media]http://www.youtube.com/watch?v=23A8tT9rVRc[/media] [b]VIDEO OF THE BODYWORK[/b] The following video shows the lifting of the bodywork. [media]http://www.youtube.com/watch?v=LAwLpPDKFwE[/media] [b]ADDING POWER FUNCTIONS[/b] This page from the instruction booklet shows what you can do by adding Power Functions. [url="https://farm1.staticflickr.com/584/22625452704_555f4b2856_o.jpg"][img]https://farm1.staticflickr.com/584/22625452704_5ef5c2b4d4_c.jpg[/img][/url] The picture below shows the parts needed to add Power Functions to the model. [url="https://farm1.staticflickr.com/760/23008976939_b903c6c07e_o.jpg"][img]https://farm1.staticflickr.com/760/23008976939_ab7695bf42_c.jpg[/img][/url] [b]VIDEO SHOWING POWER FUNCTIONS[/b] The following video demonstrates how to add Power Functions to the model, and it shows the performance when using Power Functions. I have added an additional PF Receiver to facilitate the demonstration. [media]http://www.youtube.com/watch?v=C3GRsexUTmI[/media] As you can see in the video, adding Power Functions doesn't transform this model into a Drag Racing monster. Performance with the M-motor isn't what you want it to be. Replacing the M-motor with an L-motor will obviously help, but it definitely won't be enough to make the wheelie by itself.B-MODEL
SUMMARY
Do you know that feeling that you see a car for the first time and think "how on earth did that design make it to production?!" and after a while you get used to it and the feeling somehow turns to appreciation. That's more or less what happened to me when I was writing the review. Don't get me wrong; I am still surprised that TLG failed to do better than this. Of all the models I have reviewed, this is my least favorite when it comest to the design. I am a big fan of panels, but I think the designer could have done a better job designing the front of the car. That being said, I must admit that this set started to grow on me during the build and especially during the write up of the review. It does have something going on. The Medium Azure and Black color scheme looks great and the introduction of Medium Azure in the Technic line is definitely a winner for me. Hopefully there will be more to come, parts that is. It contains two of the Tumbler Tires, which are pretty expensive by itself, starting at 10 euros on Bricklink. Although this set does have some features, I am a bit disappointed that when you use PF, the car can't do a wheelie by itself. It know the reason behind this is physically valid, but it would have made this model a lot cooler than it currently is. If you find this set for a discounted price, it might be worth picking up two copies. The suggested price of 60 Euro does seem a bit steep when you are only interested in the Tumbler Tires. All in all I started to like the Drag Racer more than I imagined before building it.SCORE
Okay, so how do I grade this set? [b][color=#800000][size=5]6[/size][/color][/b] [b]DESIGN[/b] [img]https://farm8.staticflickr.com/7488/16056649378_cd53c51c69_m.jpg[/img] [size=3]Front feels unfinished and rushed.[/size] [b][color=#800000][size=5]7[/size][/color][/b] [b]BUILDING EXPERIENCE[/b] [img]https://farm8.staticflickr.com/7523/15624316853_d44ef20b33_m.jpg[/img] [size=3]Straightforward build.[/size] [b][color=#800000][size=5]7[/size][/color][/b] [b]FEATURES[/b] [img]https://farm8.staticflickr.com/7523/15624316853_d44ef20b33_m.jpg[/img] [size=3]Nice wheelie function, but it does feel like cheating.[/size] [b][color=#800000][size=5]7[/size][/color][/b] [b]PLAYABILITY[/b] [img]https://farm8.staticflickr.com/7523/15624316853_d44ef20b33_m.jpg[/img] [size=3]Kids might enjoy the wheelie function. Power Functions don't add much.[/size] [b][color=#800000][size=5]7[/size][/color][/b] [b]PARTS[/b] [img]https://farm8.staticflickr.com/7523/15624316853_d44ef20b33_m.jpg[/img] [size=3]Two Tumbler Tires and some new pieces. Not too bad.[/size] [b][color=#800000][size=5]7[/size][/color][/b] [b]VALUE FOR MONEY[/b] [img]https://farm8.staticflickr.com/7523/15624316853_d44ef20b33_m.jpg[/img] [size=3]Good value if you are looking for Tumbler Tires.[/size] [b][color=#800000][size=6]6,8[/size][/color][/b] [b][color=#000000][size=4]NEEDS SOME WORK[/size][/color][/b]FINAL WORDS
More image can be found on my [url="https://www.flickr.com/photos/jimvangulik/albums/72157661264168922"]Flickr page[/url]. Thank you for reading. I hope you enjoyed it.Discussion about this set can be found here.